Taccoform Tutorial Series - Part II

Overview
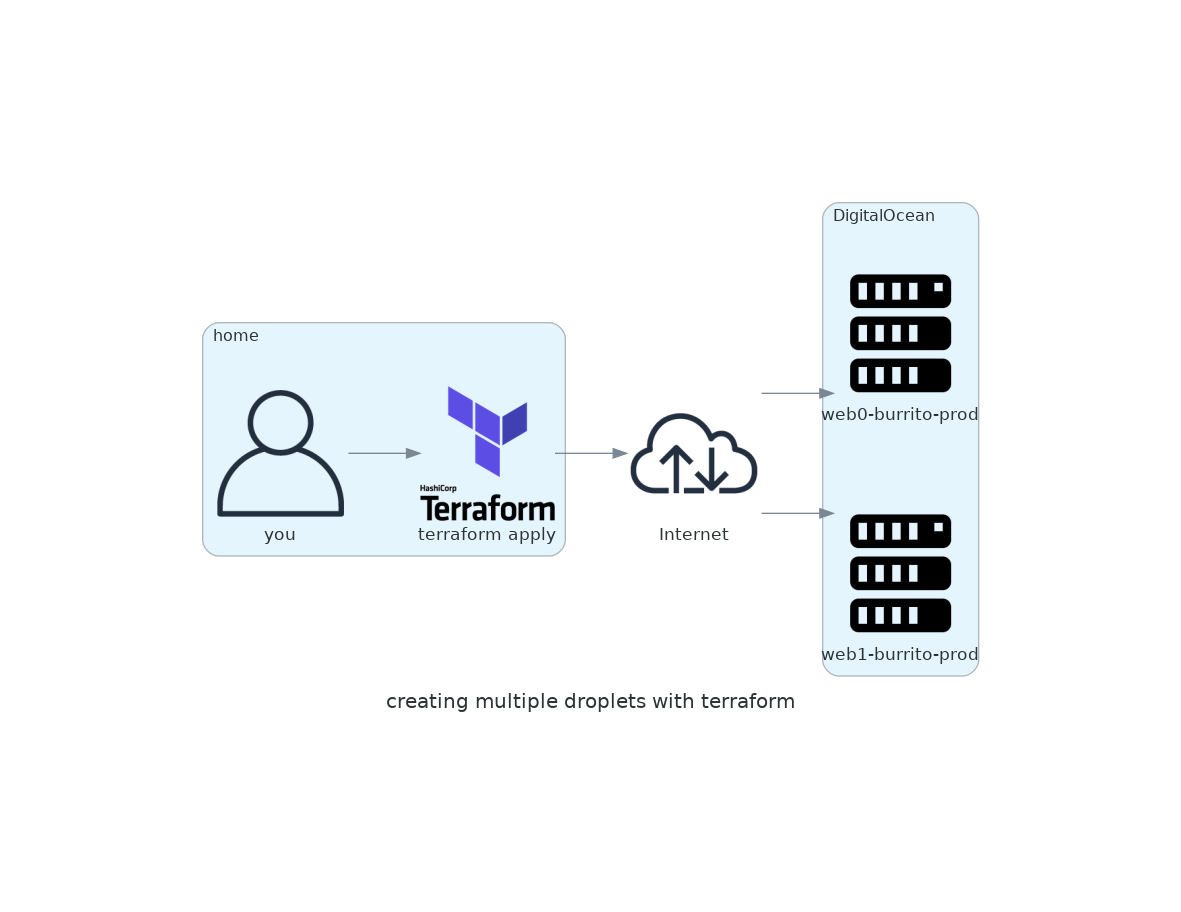
Wecome back Taccoformers! In the previous tutorial, you got up and running with Terraform in DigitalOcean and provisioned a single droplet. In Part II we will focus on building multiple droplets and best practices for keeping your code concise/readable with looping.
Lesson 2
Today’s lesson will go over:
- DRY
- Terraform’s
countparameter *or “splat”- Terraform
taint - Terraform’s
for_eachparameter forloops in Terraformoutputs
Pre-Flight
- Navigate to the
tutorial-2>appfolder in thetaccoform-tutorialrepo that you forked in Part I of the Taccoform Tutorial Series. If you don’t see the folder, you may need to update your fork - Copy your
secrets.tffile fromtutorial-1>apptotutorial-2>app
Don’t Repeat Yourself (DRY)
Let’s add another nearly identical droplet/server to the mix. With the information you have right now, you might think to copy/paste the resource and change the names like below:
droplet.tf
resource "digitalocean_droplet" "web1" {
  image     = "ubuntu-20-04-x64"
  name      = "web1-burrito-prod"
  region    = "sfo2"
  size      = "s-1vcpu-1gb"
  ssh_keys  = [data.digitalocean_ssh_key.root.id]
  user_data = templatefile("templates/user_data_nginx.yaml", { hostname = "web1-burrito-prod" })
}

resource "digitalocean_droplet" "web2" {
  image     = "ubuntu-20-04-x64"
  name      = "web2-burrito-prod"
  region    = "sfo2"
  size      = "s-1vcpu-1gb"
  ssh_keys  = [data.digitalocean_ssh_key.root.id]
  user_data = templatefile("templates/user_data_nginx.yaml", { hostname = "web2-burrito-prod" })
}
Keeping things DRY and simple can be difficult at times. Lucky for us, terraform resource definitions have a built in parameter called count. Count helps simplify the scenario above with the help of count.index.
Count
The count parameter tells terraform to loop over the resource definition based on a provided numeric value. We also use the count.index to help the resource with unique naming. If you add the count parameter and leave the name as web1-burrito-prod, terraform will try to create two resources with the same name (web1-burrito-prod.) Terraform might error out on the creation of the second droplet because a droplet with that name already exists. Even if terraform was to let you create two instances with the same name, it is not ideal to support two droplets with the same name.
-
In terminal browse to
tutorial-2>app -
Edit the
droplet.tffile’swebresource definition to includecount = 2, replace the 1 inweb1on thenameanduser_dataparameters:
droplet.tf
resource "digitalocean_droplet" "web" {
  count = 2

  image     = "ubuntu-20-04-x64"
  name      = "web${count.index}-burrito-prod"
  region    = "sfo2"
  size      = "s-1vcpu-1gb"
  ssh_keys  = [data.digitalocean_ssh_key.root.id]
  user_data = templatefile("templates/user_data_nginx.yaml", { hostname = "web${count.index}-burrito-prod" })
}
- Edit the
outputbelow thewebresource definition to include.*aferwebin the value. Also add ansto the end of the output namedroplet_public_ip:
output "droplet_public_ips" {
  value = digitalocean_droplet.web.*.ipv4_address
}
- The
*or “splat” is used in conjunction with thecountparameter in thewebresource definition. The splat tells the output to expect a list of values. In this case you are retreiving a list of IP addresses, but you can retrieve a list of any availabe droplet attributes. For example, you can retrieve the droplet names:
output "droplet_names" {
  value = digitalocean_droplet.web.*.name
}
Note: you don’t have to add the droplet_names output to the droplet.tf file, but it also won’t hurt anything if you do.
-
Save the
droplet.tffile. -
In terminal, running a
terraform planwill show you what will be provisioned:
Terraform will perform the following actions:

  # digitalocean_droplet.web[0] will be created
  + resource "digitalocean_droplet" "web" {
      + backups              = false
      + created_at           = (known after apply)
      + disk                 = (known after apply)
      + id                   = (known after apply)
      + image                = "ubuntu-20-04-x64"
      + ipv4_address         = (known after apply)
      + ipv4_address_private = (known after apply)
      + ipv6                 = false
      + ipv6_address         = (known after apply)
      + ipv6_address_private = (known after apply)
      + locked               = (known after apply)
      + memory               = (known after apply)
      + monitoring           = false
      + name                 = "web0-burrito-prod"
      + price_hourly         = (known after apply)
      + price_monthly        = (known after apply)
      + private_networking   = (known after apply)
      + region               = "sfo2"
      + resize_disk          = true
      + size                 = "s-1vcpu-1gb"
      + ssh_keys             = [
          + "12345678",
        ]
      + status               = (known after apply)
      + urn                  = (known after apply)
      + user_data            = "331465f904afe38c2787224a5c3958cb0b83e184"
      + vcpus                = (known after apply)
      + volume_ids           = (known after apply)
      + vpc_uuid             = (known after apply)
    }

  # digitalocean_droplet.web[1] will be created
  + resource "digitalocean_droplet" "web" {
      + backups              = false
      + created_at           = (known after apply)
      + disk                 = (known after apply)
      + id                   = (known after apply)
      + image                = "ubuntu-20-04-x64"
      + ipv4_address         = (known after apply)
      + ipv4_address_private = (known after apply)
      + ipv6                 = false
      + ipv6_address         = (known after apply)
      + ipv6_address_private = (known after apply)
      + locked               = (known after apply)
      + memory               = (known after apply)
      + monitoring           = false
      + name                 = "web1-burrito-prod"
      + price_hourly         = (known after apply)
      + price_monthly        = (known after apply)
      + private_networking   = (known after apply)
      + region               = "sfo2"
      + resize_disk          = true
      + size                 = "s-1vcpu-1gb"
      + ssh_keys             = [
          + "12345678",
        ]
      + status               = (known after apply)
      + urn                  = (known after apply)
      + user_data            = "f61ed69ba1092537492203cb4472cf66a13eb763"
      + vcpus                = (known after apply)
      + volume_ids           = (known after apply)
      + vpc_uuid             = (known after apply)
    }

Plan: 2 to add, 0 to change, 0 to destroy.
- Notice how an index is appended to the end of the resource, this is how terraform helps you keep track of unique resources.
- eg.
digitalocean_droplet.web[0] will be created
- The count index starts at
0and maps directly to your naming atweb0. You can do something like"web${count.index+1}-burrito-prod"to start the droplet naming atweb1, but then the index0would map toweb1. My personal preference is to align index and droplet name.
- Run a
terraform applyand approve changes when prompted:
data.digitalocean_ssh_key.root: Refreshing state...
digitalocean_droplet.web[1]: Creating...
digitalocean_droplet.web[0]: Creating...
digitalocean_droplet.web[0]: Still creating... [10s elapsed]
digitalocean_droplet.web[1]: Still creating... [10s elapsed]
digitalocean_droplet.web[1]: Still creating... [20s elapsed]
digitalocean_droplet.web[0]: Still creating... [20s elapsed]
digitalocean_droplet.web[0]: Still creating... [30s elapsed]
digitalocean_droplet.web[1]: Still creating... [30s elapsed]
digitalocean_droplet.web[0]: Creation complete after 34s [id=111111110]
digitalocean_droplet.web[1]: Still creating... [40s elapsed]
digitalocean_droplet.web[1]: Creation complete after 45s [id=111111111]

Apply complete! Resources: 2 added, 0 changed, 0 destroyed.

Outputs:

droplet_public_ips = [
  "169.99.0.1",
  "169.99.0.2",
]
-
The
droplet_public_ipsoutput shows you the public IPs of your two droplets, but doesn’t tell you which IP corresponds to which droplet. In this situation, you can assume the first IP maps toweb0and the second maps toweb1. This works for a few droplets, but can become confusing when supporting many droplets. -
After a couple of minutes of provisioning, you can open your favorite browser and navigate to each IP address (eg http://1.2.3.4) to verify that the terraform
outputmatches the hostname provided via your browser.
Managing droplets with count
- Since these are near identical droplets serving the same traffic, you can increase or decrease the number of instances depending on how many users are going to your website
- Lets bump the
countparameter to 3, save thedroplet.tffile and runterraform apply:
data.digitalocean_ssh_key.root: Refreshing state... [id=123456789]
digitalocean_droplet.web[0]: Refreshing state... [id=111111110]
digitalocean_droplet.web[1]: Refreshing state... [id=111111111]
digitalocean_droplet.web[2]: Creating...
digitalocean_droplet.web[2]: Still creating... [10s elapsed]
digitalocean_droplet.web[2]: Still creating... [20s elapsed]
digitalocean_droplet.web[2]: Still creating... [30s elapsed]
digitalocean_droplet.web[2]: Creation complete after 33s [id=111111112]

Apply complete! Resources: 1 added, 0 changed, 0 destroyed.

Outputs:

droplet_public_ips = [
  "169.99.0.1",
  "169.99.0.2",
  "169.99.0.3",
]
As you can see, the third IP address which maps to web2 has been added and your public IPs can vary greatly.
- In the scenario where something bad happens to
web1(eg stops serving web traffic), you can lower thecountparameter to1, but this would also destroy the healthyweb2which is not ideal if one droplet cannot support the traffic to your website. A better choice is to useterraform taint. Thetaintsubcommand tells terraform to mark a chosen resource as needing to be rebuilt. A resource is uniquely identified in terraform plan/apply output and/or by usingterraform showwhich will show you all of the resources which have been provisioned. The naming pattern follows the naming provided by the resource definition:
resource "digitalocean_droplet" "web" { ...
                     |            |
    count =  3 -----------------------  # count parameter's droplet list index
                     |            |  |
                     |            |  |
                     V            V  V
            digitalocean_droplet.web[1]
- To
tainttheweb1resource, runterraform taint digitalocean_droplet.web[1]:
$ terraform taint digitalocean_droplet.web[1]
Resource instance digitalocean_droplet.web[1] has been marked as tainted.
- Run
terraform planto see if terraform will execute the changes that you expect. You should see something similar to the output below:
$ terraform plan
Refreshing Terraform state in-memory prior to plan...
The refreshed state will be used to calculate this plan, but will not be
persisted to local or remote state storage.

data.digitalocean_ssh_key.root: Refreshing state... [id=123456789]
digitalocean_droplet.web[1]: Refreshing state... [id=111111111]
digitalocean_droplet.web[0]: Refreshing state... [id=111111110]
digitalocean_droplet.web[2]: Refreshing state... [id=111111112]

------------------------------------------------------------------------

An execution plan has been generated and is shown below.
Resource actions are indicated with the following symbols:
-/+ destroy and then create replacement

Terraform will perform the following actions:

  # digitalocean_droplet.web[1] is tainted, so must be replaced
-/+ resource "digitalocean_droplet" "web" {
        backups              = false
        ...
        ...
        ...
    }

Plan: 1 to add, 0 to change, 1 to destroy.

Changes to Outputs:
  ~ droplet_public_ips = [
        "169.99.0.1",
      - "169.99.0.2",
      + (known after apply),
        "169.99.0.3",
    ]
You can see web1 has been tainted and web1’s public IP will be removed from droplet_public_ips output
- Now to rebuild
web1, runterraform applyand confirm the changes when prompted:
data.digitalocean_ssh_key.root: Refreshing state... [id=123456789]
digitalocean_droplet.web[2]: Refreshing state... [id=111111112]
digitalocean_droplet.web[1]: Refreshing state... [id=111111111]
digitalocean_droplet.web[0]: Refreshing state... [id=111111110]
digitalocean_droplet.web[1]: Destroying... [id=111111111]
digitalocean_droplet.web[1]: Still destroying... [id=111111111, 10s elapsed]
digitalocean_droplet.web[1]: Still destroying... [id=111111111, 20s elapsed]
digitalocean_droplet.web[1]: Destruction complete after 22s
digitalocean_droplet.web[1]: Creating...
digitalocean_droplet.web[1]: Still creating... [10s elapsed]
digitalocean_droplet.web[1]: Still creating... [20s elapsed]
digitalocean_droplet.web[1]: Still creating... [30s elapsed]
digitalocean_droplet.web[1]: Creation complete after 34s [id=111111116]

Apply complete! Resources: 1 added, 0 changed, 1 destroyed.

Outputs:

droplet_public_ips = [
  "169.99.0.1",
  "169.99.1.65",
  "169.99.0.3",
]
Notice how web1’s rebuild causes the unique id to change and it gives the new web1 a different public IP address in the droplet_public_ips output
Pros
- Adheres to DRY (Don’t Repeat Yourself)
- Simple to implement
- Droplets follow strict number incrementing naming convention
- Great for creating identical resource (eg. web servers)
Cons
- Terraform can sometimes get into a non-ideal state when adding/removing resources due to list iteration
- Can become tricky with more complex configurations
- Terraform plan/apply output is not as clear because it uses the droplet index rather than the name
For Each
- Count has been around for a while in terraform, but due to the inability to handle more complex inputs, the
for_eachparameter has been introduced to the terraform resource definition.
- Let’s start by commenting out the existing resource definition and output by adding a
#to each line:
# resource "digitalocean_droplet" "web" {
#   count = 2

#   image     = "ubuntu-20-04-x64"
#   name      = "web${count.index}-burrito-prod"
#   region    = "sfo2"
#   size      = "s-1vcpu-1gb"
#   ssh_keys  = [data.digitalocean_ssh_key.root.id]
#   user_data = templatefile("templates/user_data_nginx.yaml", { hostname = "web${count.index}-burrito-prod" })
# }

# output "droplet_public_ips" {
#   value = digitalocean_droplet.web.*.ipv4_address
# }
Note: In VS Code you can use ctrl+/ (in windows) and cmd+/ (in mac) to comment out lines. You can even select multiple lines and use the shortcut to comment them out.
- Run
terraform applywhich will prompt you to confirm the removal of the two droplets created withcount:
Do you want to perform these actions?
  Terraform will perform the actions described above.
  Only 'yes' will be accepted to approve.

  Enter a value: yes

digitalocean_droplet.web[0]: Destroying... [id=111111110]
digitalocean_droplet.web[1]: Destroying... [id=111111116]
digitalocean_droplet.web[2]: Destroying... [id=111111112]
digitalocean_droplet.web[0]: Still destroying... [id=111111110, 10s elapsed]
digitalocean_droplet.web[1]: Still destroying... [id=111111116, 10s elapsed]
digitalocean_droplet.web[2]: Still destroying... [id=111111112, 10s elapsed]
digitalocean_droplet.web[0]: Still destroying... [id=111111110, 20s elapsed]
digitalocean_droplet.web[1]: Still destroying... [id=111111116, 20s elapsed]
digitalocean_droplet.web[2]: Still destroying... [id=111111112, 20s elapsed]
digitalocean_droplet.web[1]: Destruction complete after 22s
digitalocean_droplet.web[0]: Destruction complete after 22s
digitalocean_droplet.web[2]: Destruction complete after 22s

Apply complete! Resources: 0 added, 0 changed, 2 destroyed.
- Create a new resource with
for_eachinstead ofcount:
resource "digitalocean_droplet" "web" {
  for_each = {
        "web0" = "web0-burrito-prod"
        "web1" = "web1-burrito-prod"
    }

  image     = "ubuntu-20-04-x64"
  name      = each.value
  region    = "sfo2"
  size      = "s-1vcpu-1gb"
  ssh_keys  = [data.digitalocean_ssh_key.root.id]
  user_data = templatefile("templates/user_data_nginx.yaml", { hostname = each.value })
}
-
The first difference you will see is a map containing
web0andweb1keys in thefor_eachparameter. The values are theweb0-burrito-prodandweb1-burrito-prodto the right of theweb0andweb1keys. Maps can get way more nested and intricate than this example to handle more complex conifgurations and looping for resource definition creation. -
The next thing you will notice is
nameparameter changed,each.valuetells terraform to set the key’s value as thename. Terraform will then continue thefor_eachloop until there are no more objects in the map. For example:- The
for_eachloop will tell terraform to start with the map’s"web0" = "web0-burrito-prodobject. - Terraform will start wit the
imageparameter, but that’s a statically set value, so the loop doesn’t need to do anything else for that parameter and moves on. - On
name, terraform will recognizeeach.valueand replace it withweb0-burrito-prod - Terraform will recognize
regionandsizeparameters as statically set values, so the loop doesn’t need to do anything else for those parameter and moves on. - On
ssh_keys, some variable interpolation happens, but not related to the loop.data.digitalocean_ssh_key.root.idis a reference to the resource lookup at the top of yourdroplets.tffile. - On
user_data, the loop recognizeseach.valueat the end and substitutesweb0-burrito-prodin its place. - Terraform will then go to the next object in the
for_eachmap ("web1" = "web1-burrito-prod") and go through the same parameter checking process as it did with"web0" = "web0-burrito-prod". After going through"web1" = "web1-burrito-prod", the loop will end and have created two new web droplets.
- The
- Add a new ip
droplet_public_ipsoutputfor the new resource definition usingfor_each:
output "droplet_public_ips" {
  value       = {
    for droplet in digitalocean_droplet.web:
    droplet.name => droplet.ipv4_address
  }
}
- As you might have noticed, the output is a bit more complex than the output for droplets created with
count - Walking through this, the output uses
for(or a for loop) to go through each of the droplets created withfor_eachin thedigitalocean_dropletwebresource definition. It adds a new object to thedroplet_public_ipsoutputmap with the droplet name as the key and the droplet ip address as thevalue
Running Terraform with for_each
- Now you are ready to see if terraform is going to do what you expect it to do, run
terraform plan:
$ terraform plan
Refreshing Terraform state in-memory prior to plan...
The refreshed state will be used to calculate this plan, but will not be
persisted to local or remote state storage.

data.digitalocean_ssh_key.root: Refreshing state...

------------------------------------------------------------------------

An execution plan has been generated and is shown below.
Resource actions are indicated with the following symbols:
  + create

Terraform will perform the following actions:

  # digitalocean_droplet.web["web0"] will be created
  + resource "digitalocean_droplet" "web" {
      + backups              = false
      + created_at           = (known after apply)
      + disk                 = (known after apply)
      + id                   = (known after apply)
      + image                = "ubuntu-20-04-x64"
      + ipv4_address         = (known after apply)
      + ipv4_address_private = (known after apply)
      + ipv6                 = false
      + ipv6_address         = (known after apply)
      + ipv6_address_private = (known after apply)
      + locked               = (known after apply)
      + memory               = (known after apply)
      + monitoring           = false
      + name                 = "web0-burrito-prod"
      + price_hourly         = (known after apply)
      + price_monthly        = (known after apply)
      + private_networking   = (known after apply)
      + region               = "sfo2"
      + resize_disk          = true
      + size                 = "s-1vcpu-1gb"
      + ssh_keys             = [
          + "12345678",
        ]
      + status               = (known after apply)
      + urn                  = (known after apply)
      + user_data            = "9af6308fba3c408e311eea495a9d288f1234567"
      + vcpus                = (known after apply)
      + volume_ids           = (known after apply)
      + vpc_uuid             = (known after apply)
    }

  # digitalocean_droplet.web["web1"] will be created
  + resource "digitalocean_droplet" "web" {
      + backups              = false
      + created_at           = (known after apply)
      + disk                 = (known after apply)
      + id                   = (known after apply)
      + image                = "ubuntu-20-04-x64"
      + ipv4_address         = (known after apply)
      + ipv4_address_private = (known after apply)
      + ipv6                 = false
      + ipv6_address         = (known after apply)
      + ipv6_address_private = (known after apply)
      + locked               = (known after apply)
      + memory               = (known after apply)
      + monitoring           = false
      + name                 = "web1-burrito-prod"
      + price_hourly         = (known after apply)
      + price_monthly        = (known after apply)
      + private_networking   = (known after apply)
      + region               = "sfo2"
      + resize_disk          = true
      + size                 = "s-1vcpu-1gb"
      + ssh_keys             = [
          + "12345678",
        ]
      + status               = (known after apply)
      + urn                  = (known after apply)
      + user_data            = "331465f904afe38c2787224a5c39581234567"
      + vcpus                = (known after apply)
      + volume_ids           = (known after apply)
      + vpc_uuid             = (known after apply)
    }

Plan: 2 to add, 0 to change, 0 to destroy.
- Run a
terraform applyand approve changes when prompted:
data.digitalocean_ssh_key.root: Refreshing state... [id=12345678]
digitalocean_droplet.web["web1"]: Creating...
digitalocean_droplet.web["web0"]: Creating...
digitalocean_droplet.web["web1"]: Still creating... [10s elapsed]
digitalocean_droplet.web["web0"]: Still creating... [10s elapsed]
digitalocean_droplet.web["web0"]: Still creating... [20s elapsed]
digitalocean_droplet.web["web1"]: Still creating... [20s elapsed]
digitalocean_droplet.web["web1"]: Still creating... [30s elapsed]
digitalocean_droplet.web["web0"]: Still creating... [30s elapsed]
digitalocean_droplet.web["web0"]: Creation complete after 33s [id=111111111]
digitalocean_droplet.web["web1"]: Still creating... [40s elapsed]
digitalocean_droplet.web["web1"]: Creation complete after 44s [id=111111112]

Apply complete! Resources: 2 added, 0 changed, 0 destroyed.

Outputs:

droplet_public_ips = {
  "web0-burrito-prod" = "169.99.1.1"
  "web0-burrito-prod" = "169.99.1.2"
}
- As you can see
droplet_public_ipsoutput is waaaay more clear to see the mapping of droplet to ip address. - After a couple of minutes of provisioning, you can open your favorite browser and navigate to each IP address (eg http://1.2.3.4) to verify that the terraform
outputmatches the hostname provided via your browser. - Destroy the droplets when you are done by running
terraform destroy
Pros
- Adheres to DRY (Don’t Repeat Yourself)
- Allows for more complex configurations
- Doesn’t get tripped up by adding/removing resources
- Loose naming convention
Cons
- Syntax can get messy
- Harder to follow what’s going on
- Terraform outputs feel more complicated than looping with
count
In Review
- You used
countandfor_eachto provision multiple droplets - You learned how to manage droplets when using
countandfor_each - You created DRY Terraform code
You have several ways to create multiple similar resources at your disposal. I would recommend testing count and for_each when you are creating resources in terraform. You may also find scenarios where both options make things harder to understand/troubleshoot and not using loops is the best way to move forward.
As always, feel free to reach out on twitter via @taccoform for questions and/or feedback on this post