Taccoform Tutorial Series - Part III

Overview
Greetings Taccoformers! In the previous tutorial you learned how to create multiple resources with count and for_each. In Part III of the Taccoform Tutorial Series, we’ll focus on creating variables to keep our terraform code easy to work on and DRY (Don’t Repeat Yourself).
Lesson 3
Today’s lesson will cover:
- Creating variable definitions
- Variable naming
- How to organize variables
- Using variables in resource definitions
- Creating a load balancer
- Using variables across multiple resource definitions
- How to override a variables default value
Pre-Flight
- Navigate to the
tutorial-3>appfolder in thetaccoform-tutorialrepo that you forked in Part I of the Taccoform Tutorial Series. If you don’t see the folder, you may need to update your fork - Copy your
secrets.tffile fromtutorial-2>apptotutorial-3>app
Variable creation
The Anatomy of a Variable
variable "env" {
  description = "short and unique environment name"
  default     = "prod"
}
| Component | Description |
|---|---|
| description | an optional parameter, but I strongly suggest assigning one to every variable |
| default | an optional parameter that assigns a default value to the variable if one isn’t provided |
- In the example above we’ve created a string variable, but you can also create variables which are booleans, integers, lists and maps.
list example
variable "private_networks" {
  description = "a list of default private networks"
  default     = ["10.0.0.0/24","10.0.1.0/24","10.0.2.0/24]
}
integer example
variable "droplet_count" {
  description = "the amount of droplets to provision"
  default     = 2
}
boolean example
variable "droplet_monitoring" {
  description = "boolean controlling whether monitoring agent is installed"
  default     = true
}
map example
variable "droplet_names" {
  description = "map of droplet names"
  default = {
        "web0" = "web0-burrito-prod"
        "web1" = "web1-burrito-prod"
    }
}
Variable Naming
Variable naming isn’t always easy, but there are a couple things that I’ve picked up on:
- If there is a variable that you want to set to a paramater in a resource definition, be sure you align the variable name to the parameter.
- eg.
resource "digitalocean_droplet" "web" {

  image  = var.droplet_image
  ...
  ...

}
Notice the droplet_ prefix, this helps when you have different resource definitions with similar parameter names.
- You will also have variables that will be used by multiple resource definitions. Some of these variables will be consistent across all of your resources which require them. An example of this type of variable in DigitalOcean is
region. It’s likely that you would want to build resources which work together and a common cloud provider constraint is that all complimentary resources must reside in the same geographic region. Each cloud provider has created their own shorthand for the geographic regions they’ve created to host your resources.- eg.
resource "digitalocean_droplet" "web" {

  image  = var.droplet_image
  ...
  region = var.region

}

resource "digitalocean_loadbalancer" "public" {

  ...
  region = var.region
  ...

}
- Another type of variable that is used across multiple resource definitions will be specific to you and/or your company. These variables will help inforce standardized naming and provide uniquness to the resources that you have created. Common variables of this type are
service(orapp) andenv(orenvironment)- eg.
resource "digitalocean_droplet" "web" {

  image  = var.droplet_image
  name   = "web-${var.service}-${var.env}"
  region = var.region

}

resource "digitalocean_loadbalancer" "public" {

  name   = "pub-lb-${var.service}-${var.env}"
  region = var.region
  ...

}
The quotes/$/curly brackets are necessary because some variable interpolation is happening prior to passing the value to the resource definition’s name parameter. droplet_image and region are passed to the resource definition “as-is”, so they don’t require the extra formatting. You might wonder why we don’t just set the interpolation ("lb-${var.service}-${var.env}") as the default when creating the variable, but terraform doesn’t allow you to do this in regular variables.
Variable Organization
- Start this section by opening your fork of the
taccoform-tutorialrepo and browsing to thetutorial-3/app.Copy yoursecrets.tffrom the previous tutorial’s folder. Open thedroplet.tffile, uncomment the resource definition (andoutput) which usescountand comment out the resource definition (andoutput) that usesfor_each. Your newdroplet.tffile should look like this:
droplet.tf
data "digitalocean_ssh_key" "root" {
  name = "taccoform-tutorial"
}

resource "digitalocean_droplet" "web" {
  count = 2

  image     = "ubuntu-20-04-x64"
  name      = "web${count.index}-burrito-prod"
  region    = "sfo2"
  size      = "s-1vcpu-1gb"
  ssh_keys  = [data.digitalocean_ssh_key.root.id]
  user_data = templatefile("templates/user_data_nginx.yaml", { hostname = "web${count.index}-burrito-prod" })
}

output "droplet_public_ips" {
  value = digitalocean_droplet.web.*.ipv4_address
}


# resource "digitalocean_droplet" "web" {
#   for_each = {
#         "web0" = "web0-burrito-prod"
#         "web1" = "web1-burrito-prod"
#     }

#   image     = "ubuntu-20-04-x64"
#   name      = each.value
#   region    = "sfo2"
#   size      = "s-1vcpu-1gb"
#   ssh_keys  = [data.digitalocean_ssh_key.root.id]
#   user_data = templatefile("templates/user_data_nginx.yaml", { hostname = each.value })
# }

# output "droplet_public_ips" {
#   value       = {
#     for droplet in digitalocean_droplet.web:
#     droplet.name => droplet.ipv4_address
#   }
# }
Variable File Organization
- You can put your variable definitions in any
.tfand the usual “Hello World” Terraform tutorials will usually tell you to create two files. Amain.tffile for all of your resource definitions and avariables.tffile for all of your variable definitions. Don’t do this. It’s not that you can’t fix it later, but the organization in advance will help you a ton with understanding the components of your terraform and there are several advantages that will come later when you are troubleshooting your terraform and/or when you start to create reusable terraform modules. I like to separate resources by their type (eg.droplets.tf) and accompanied by a variable file (eg.droplets_variables.tf).
- Create a new
droplet_variables.tffile next to yourdroplet.tffile. - Take a look at the
webresource definition in yourdroplets.tfand take note of the parameters that area strings or integers
countimagenameregionsize
- Let’s create variables for these parameters and place them in their logical variable file.
countis a parameter that every resource has the ability to assign, but in this particular instance we’re concerned with the number of droplets to provision.
- Create a new variable definition for
droplet_countindroplet_variables.tf:
variable "droplet_count" {
  description = "the number of droplets to provision"
  default     = 2
}
imageis a parameter which is specific to the droplet creation, so the variable belongs with other droplet variables indroplet_variables.tf
- Under the
countvariable definition, create a new variable definition fordroplet_imageindroplet_variables.tf:
variable "droplet_image" {
  description = "the base image/OS to use for provisioning the droplet"
  default     = "ubuntu-20-04-x64"
}
Notice how the default value was pulled directly from the value assigned to image in the droplet resource definition
nameis an interesting one because it’s using variable interpolaion because of the count paramater and because it represents multiple variables, some that can be used by other resource definitions.
webrepresents a node/droplet/vm type.burritorepresents a unique service and/or application name that can help group related resources.prodrepresents a unique environment/stage name shared by adjacent resources.
 name      = "web${count.index}-burrito-prod"
               |                     |      \
               |                     |       \
               |                     |        |
               V                     V        V
            Node Type - #   -     Service - Environment
- Create a new
droplet_node_typevariable definition in thedroplet_variables.tffile
variable "droplet_node_type" {
  description = "the node/droplet/vm type"
  default     = "web"
}
- For the next string
burrito, which is the service and/or application name, you will need to create a variable file for variables that are common among all resources. Create avariables.tffile for these variables. You’re probably rolling your eyes right now because earlier I told you to not usevariables.tf. Context is important here, in that previous scenario you’d be putting EVERY variable definition in one file. In this scenario, you’ll just be storing a few variables in thevariables.tffile. This file name also isn’t set in stone, you could use any.tfname tha makes sense to you.
variables.tf
variable "service" {
  description = "a short/unique service and/or application name"
  default     = "web"
}
- The next string
prodis similar toburrito(or service name) in that it would be used by multiple resources and that environment variable should live invariables.tf
- Create an
envvariable definition:
variable "env" {
  description = "a short/unique environment name"
  default     = "prod"
}
- The next variable in the list after
nameisregion, this is a variable that could potentially be used by multiple resources to tell DigitalOcean where to provision the infrastructure.
- Create a
regionvariable definition invariables.tf:
variable "region" {
  description = "a digital ocean provided geographic location"
  default     = "sfo2"
}
- And finally, the
sizeparameter is specific to the droplet resource definition and “size” can be a common parameter name for cloud resources, so it’s especially important to prefix the variable name withdroplet_to clearly signify what this size maps to
variable "droplet_size" {
  description = "digital ocean provided droplet size"
  default     = "s-1vcpu-1gb"
}
- After all is said and done, your
droplet_variables.tffile should look like this:
variable "droplet_count" {
  description = "the number of droplets to provision"
  default     = 2
}

variable "droplet_image" {
  description = "the base image/OS to use for provisioning the droplet"
  default     = "ubuntu-20-04-x64"
}

variable "droplet_node_type" {
  description = "the node/droplet/vm type"
  default     = "web"
}

variable "droplet_size" {
  description = "digital ocean provided droplet size"
  default     = "s-1vcpu-1gb"
}
- And your
variables.tffile should look like this:
variable "service" {
  description = "a short/unique service and/or application name"
  default     = "burrito"
}

variable "env" {
  description = "a short/unique environment name"
  default     = "prod"
}

variable "region" {
  description = "a digital ocean provided geographic location"
  default     = "sfo2"
}
Using Variables in Resource Definitions
- Now that you’ve defined variables, it’s time to plug them into a resource definition.
- Open the
droplet.tffile and scroll down to thecountparameter in thedropletresource definition - Replace the
countvalue of2to thedroplet_countvariable you previously created. To call a variable, you need to use.varas a prefix. In this case, it would bevar.droplet_countand it would look like this:
droplet.tf
resource "digitalocean_droplet" "web" {
  count = var.droplet_count
  ...
  ...
  ...
}
- Replace the
imageparameter value with thedroplet_imagevariable you created
- eg.
image = var.droplet_image
- Moving on to the
nameparamter, it requires a little bit more syntax because it will be doing a bit of interpolation or manipulation of the string prior to sending the request to DigitalOcean.
- Replace
webwith${var.droplet_node_type}. the$and curly brackets are required when performing variable interpolation. If you don’t put the$and curl brackets around the variable, interpret that literally and you’ll end up with a droplet namedvar.droplet_node_type0-burrito-prod - Replace
burritowith${var.service} - Replace
prodwith${var.env} - While you are at it, perform the previous three steps on the
user_dataparameter in thewebdroplet’s resource definition
- Replace the
regionparameter’s value to theregionvariable you defined earlier - Replace the
sizeparameter’s value to thedroplet_sizevariable you created previously and save thedroplet.tffile
- Your
webdroplet’s resource definition should look like this now:
droplet.tf
resource "digitalocean_droplet" "web" {
  count = var.droplet_count

  image     = var.droplet_image
  name      = "${var.droplet_node_type}${count.index}-${var.service}-${var.env}"
  region    = var.region
  size      = var.droplet_size
  ssh_keys  = [data.digitalocean_ssh_key.root.id]
  user_data = templatefile("templates/user_data_nginx.yaml", { hostname = "${var.droplet_node_type}${count.index}-${var.service}-${var.env}" })
}
- Run
terraform initthenterraform planto verify that your substitutions have worked. If you get errors from either command, double-check your spelling on the variable definitions and where they are called in the resource definitions. Another thing to check is the syntax when calling variables, especially on thenameparameter where it requires multiple sets of$sign and curly brackets{}.
- And now you’re saying to yourself, “Ok I’m exactly where I was before with the terraform provisioning, I don’t think it’s worth all that extra work.” I don’t blame that line of thought. Where this becomes interesting is when you’re managing more resources and troubleshooting.
Adding a Load Balancer
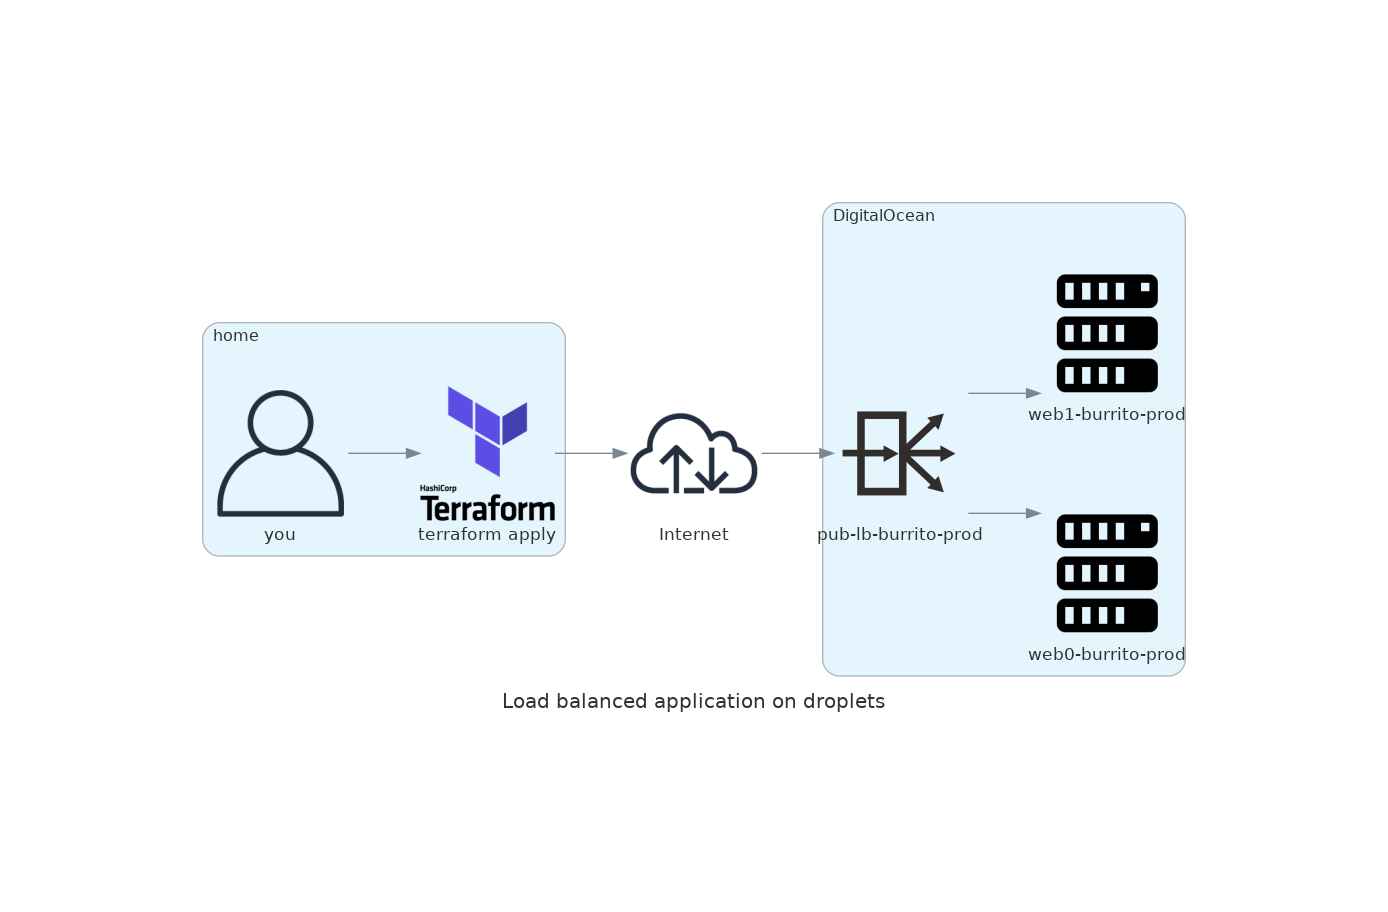
- At some point your application will become super popular and you’re on your way to becoming a millionaire, but first you need to make sure your application can scale. Adding a load balancer in front of your droplets will allow you to add more droplets as your traffic increases. In the default configuration, a load balancer will send traffic in a round-robin fashion to each of your droplets. If you configure round-robin with three droplets, the load balancer will send the first request to the first droplet, second request to the second droplet, third request to the third droplet, fourth request to the first droplet, fifth request to the second droplet, etc, etc.
- Create
loadbalancer.tfandloadbalancer_variables.tfintutorial-3>app
- Your directory should look like this now:
├── droplet.tf
├── droplet_variables.tf
├── loadbalancer.tf
├── loadbalancer_variables.tf
├── provider.tf
├── secrets.tf
├── templates
│   └── user_data_nginx.yaml
└── variables.tf
- Open the
loadbalancer.tffile, paste in the following, and save it:
resource "digitalocean_loadbalancer" "public" {
  name   = "loadbalancer-1"
  region = "nyc3"

  forwarding_rule {
    entry_port     = 80
    entry_protocol = "http"

    target_port     = 80
    target_protocol = "http"
  }

  healthcheck {
    port     = 22
    protocol = "tcp"
  }

  droplet_ids = [digitalocean_droplet.web.id]
}
This was pulled directly from the terraform documentations for DigitalOcean’s load balancer
- Now we’re gonna use some of the same variables we’ve used previously. Starting with
name, lets try to keep naming consistent by changing the value to"pub-lb-${var.service}-${var.env}"
- This will align the droplet name of
web0-burrito-prodtopub-lb-burrito-prod
- Moving on to the
regionparameter, we already have aregionvariable defined, so we can just use it again here - Things get a little different when you get to the
forwarding_rule. If you created a variable definition with the full unique name, it would be something likeloadbalancer_forwarding_rule_entry_port_httpwhich is a bit excessive and there’s definitely a character limit. I usually shorten these variable names tolb_fr_entry_port_http. Create a variable for each of these forwarding rule parameters inloadbalancer_variables.tf.
- Your
loadbalancer_variables.tffile should look similar to this, with different descriptions:
variable "lb_fr_entry_port_http" {
    description = "the TCP port which outside users are allowed to connect to on the load balancer"
    default     = 80
}

variable "lb_fr_entry_protocol_http" {
    description = "the protocol which outside users are allowed to connect to on the load balancer"
    default     = "http"
}

variable "lb_fr_target_port_http" {
    description = "after the initial connection to the load balancer, request will be forwarded to this TCP on a droplet"
    default     = 80
}

variable "lb_fr_target_protocol_http" {
    description = "after the initial connection to the load balancer, request will be forwarded as this protocol on a droplet"
    default     = "http"
}
Note: Try to create descriptions that are more verbose to help you with understanding the shortened variable names
- Replace the forwarding rule parameters with the variables you’ve created for it:
  forwarding_rule {
    entry_port     = var.lb_fr_entry_port_http
    entry_protocol = var.lb_fr_entry_protocol_http

    target_port     = var.lb_fr_target_port_http
    target_protocol = var.lb_fr_target_protocol_http
  }
- Now looking at the
healthcheckparameters, there’s something that bugs me a bit. This is telling the load balancer to send web requests to droplets when the load balancer can connect to the droplet via SSH. With this logic, a droplet is deemed healthy when it can be reached by SSH. This is a problem in the event that the droplet is online, but the web service or application is not responding. Let’s fix this by using the previously defined forwarding rule target variables:
  healthcheck {
    port     = var.lb_fr_target_port_http
    protocol = var.lb_fr_target_protocol_http
  }
- You will also need to add a new
pathparameter to thehealthcheckparameters because it’s required when doing ahttphealth check. Create alb_hc_pathvariable in theloadbalancer_variables.tffile
loadbalancer.tf
  healthcheck {
    path     = var.lb_hc_path
    port     = var.lb_fr_target_port_http
    protocol = var.lb_fr_target_protocol_http
  }
loadbalancer_variables.tf
variable "lb_hc_path" {
  description = "the path to perform the http healtcheck on"
  default     = "/"
}
Note: the default value is the base path, eg http://www.taccoform.com, but it’s common to use a dedicated healthcheck path like http://www.taccoform.com/health
- Create an
outputfor the load balancer public IP address so that you can easily retrieve it.
output "lb-pub-ip" {
  value = digitalocean_loadbalancer.public.ip
}
- Make sure all of your files are saved, then run
terraform plan
- Your
terraform planshould show that it’s creating two droplets and a load balancer:
Terraform will perform the following actions:

  # digitalocean_droplet.web[0] will be created
  + resource "digitalocean_droplet" "web" {
      + backups              = false
      + created_at           = (known after apply)
      + disk                 = (known after apply)
      + id                   = (known after apply)
      + image                = "ubuntu-20-04-x64"
      + ipv4_address         = (known after apply)
      + ipv4_address_private = (known after apply)
      + ipv6                 = false
      + ipv6_address         = (known after apply)
      + ipv6_address_private = (known after apply)
      + locked               = (known after apply)
      + memory               = (known after apply)
      + monitoring           = false
      + name                 = "web0-burrito-prod"
      + price_hourly         = (known after apply)
      + price_monthly        = (known after apply)
      + private_networking   = (known after apply)
      + region               = "sfo2"
      + resize_disk          = true
      + size                 = "s-1vcpu-1gb"
      + ssh_keys             = [
          + "28662501",
        ]
      + status               = (known after apply)
      + urn                  = (known after apply)
      + user_data            = "1234567890"
      + vcpus                = (known after apply)
      + volume_ids           = (known after apply)
      + vpc_uuid             = (known after apply)
    }

  # digitalocean_droplet.web[1] will be created
  + resource "digitalocean_droplet" "web" {
      + backups              = false
      + created_at           = (known after apply)
      + disk                 = (known after apply)
      + id                   = (known after apply)
      + image                = "ubuntu-20-04-x64"
      + ipv4_address         = (known after apply)
      + ipv4_address_private = (known after apply)
      + ipv6                 = false
      + ipv6_address         = (known after apply)
      + ipv6_address_private = (known after apply)
      + locked               = (known after apply)
      + memory               = (known after apply)
      + monitoring           = false
      + name                 = "web1-burrito-prod"
      + price_hourly         = (known after apply)
      + price_monthly        = (known after apply)
      + private_networking   = (known after apply)
      + region               = "sfo2"
      + resize_disk          = true
      + size                 = "s-1vcpu-1gb"
      + ssh_keys             = [
          + "28662501",
        ]
      + status               = (known after apply)
      + urn                  = (known after apply)
      + user_data            = "1234567890"
      + vcpus                = (known after apply)
      + volume_ids           = (known after apply)
      + vpc_uuid             = (known after apply)
    }

  # digitalocean_loadbalancer.public will be created
  + resource "digitalocean_loadbalancer" "public" {
      + algorithm                = "round_robin"
      + droplet_ids              = (known after apply)
      + enable_backend_keepalive = false
      + enable_proxy_protocol    = false
      + id                       = (known after apply)
      + ip                       = (known after apply)
      + name                     = "pub-lb-burrito-prod"
      + redirect_http_to_https   = false
      + region                   = "sfo2"
      + status                   = (known after apply)
      + urn                      = (known after apply)
      + vpc_uuid                 = (known after apply)

      + forwarding_rule {
          + entry_port      = 80
          + entry_protocol  = "http"
          + target_port     = 80
          + target_protocol = "http"
          + tls_passthrough = false
        }

      + healthcheck {
          + check_interval_seconds   = 10
          + healthy_threshold        = 5
          + path                     = "/"
          + port                     = 80
          + protocol                 = "http"
          + response_timeout_seconds = 5
          + unhealthy_threshold      = 3
        }

      + sticky_sessions {
          + cookie_name        = (known after apply)
          + cookie_ttl_seconds = (known after apply)
          + type               = (known after apply)
        }
    }

Plan: 3 to add, 0 to change, 0 to destroy.

Changes to Outputs:
  + droplet_public_ips = [
      + (known after apply),
      + (known after apply),
    ]
- Run
terraform applyand confirm to provision the droplets and load balancer
Apply complete! Resources: 3 added, 0 changed, 0 destroyed.

Outputs:

droplet_public_ips = [
  "5.5.5.5",
  "5.5.5.6",
]
lb-pub-ip = "4.5.6.7"
- Wait a minute for the droplets to finish provisioning, then browse to the load balancer’s IP address provided by
lb-pub-ip. You should seeweb0-burrito-prod IS ALIVE!!!orweb1-burrito-prod IS ALIVE!!!and if you furiously refresh, you should see the output changing back and forth between the two droplets.
Overriding variables
- Now that you’ve variable-ized all the things, you can do some fun stuff like:
- Increase number of droplets without changing the
.tffiles:terraform plan -var 'droplet_count=5' - Remove all the droplets without destroying the load balancer:
terraform plan -var 'droplet_count=0'
- This is great for iterating over changes to the user data provisioning script
- Change the environment:
terraform plan -var 'env=stg' - You can also override multiple variables by creating a
.tfvars
custom.tfvars
droplet_count = 1
service       = "tacos"
Now run terraform plan -var-file="custom.tfvars" and review how it changes the infrastructure.
- For fun, run
terraform apply -var 'droplet_node_type=carneasada'
- After a few minutes, browse to the
lb-pub-ipand you should see how the page has changed. Refreshing the page multiple times shows how the traffic is being distributed to each droplet.
- As always, run
terraform destroyto delete all of the resources you’ve created in this lesson to stop being charged for them
In Review
- You’ve learned how to create variables and the different types of variables you can define
- You learned how to use variables in resource definitions
- You reused variables (eg. env, service, region)
- You created a load balanced application
- You learned how to override default variable values
Conclusion
- Variables can be difficult to name and they eat up a bunch of your time, but it’s a worthy investment in the long run. What you have now is reuseable code which can be copied to other terraform workspaces. You are also a few short steps away from creating a terraform module.
Check out the next entry in the Taccoform Tutorial Series which will go over Terraform statefiles and how to use them.
As always, feel free to reach out on twitter via @taccoform for questions and/or feedback on this post